Learning how to stain wood for beginners is a rewarding and creative process that enhances the beauty and durability of your wooden projects. Whether you’re refinishing furniture or creating something new, the right stain can make a significant difference. In this guide, we’ll walk you through the essential steps, tips, and techniques to get it right.
What Materials Do You Need for Staining Wood?
Before you begin, it’s essential to gather all the necessary materials. Here’s a list of what you’ll need:
- Wood stain: Choose a high-quality product suited for your wood type.
- Brushes or foam applicators: For even application.
- Lint-free cloths: To wipe off excess stain.
- Sandpaper: For smoothing the surface.
- Clean, dry rags: For cleaning up.
- Protective gear: Gloves and a mask to prevent inhaling fumes.
- Drop cloths or newspaper: To protect surfaces.
Having the right materials is crucial when learning how to stain wood for beginners.
How Do You Prepare Wood for Staining?
Preparation is key to achieving a beautiful finish. Here are the essential steps to prepare your wood:
-
Choose the Right Wood: Different wood types absorb stain differently. Hardwoods like oak and maple showcase stains well compared to softer woods like pine.
-
Sand the Surface: Use sandpaper starting with a coarse grit (around 120) and then progressing to a finer grit (around 220).
- Sand in the direction of the wood grain.
- This step removes any imperfections and smooths the surface for better stain absorption.
- Clean the Surface: After sanding, use a vacuum or a lint-free cloth to remove dust and debris.
- Ensure that the surface is clean and dry to allow for even staining.
How to Choose the Right Wood Stain?
When you’re exploring how to stain wood for beginners, selecting the right stain type is crucial. Here are the different types of wood stain to consider:
- Oil-based Stains:
- Provide rich color and depth.
- Dry slowly, allowing for blending and adjustment.
-
More durable than water-based options.
-
Water-based Stains:
- Dries faster and is easier to clean up.
- Less odor, making it ideal for indoor projects.
-
Allows the wood’s natural grain to show through.
-
Gel Stains:
- Ideal for vertical surfaces and different types of wood.
- Can be applied thickly and doesn’t drip as much.
- Perfect for achieving a consistent color.
Choose a stain that complements your project and is easy for you to work with.
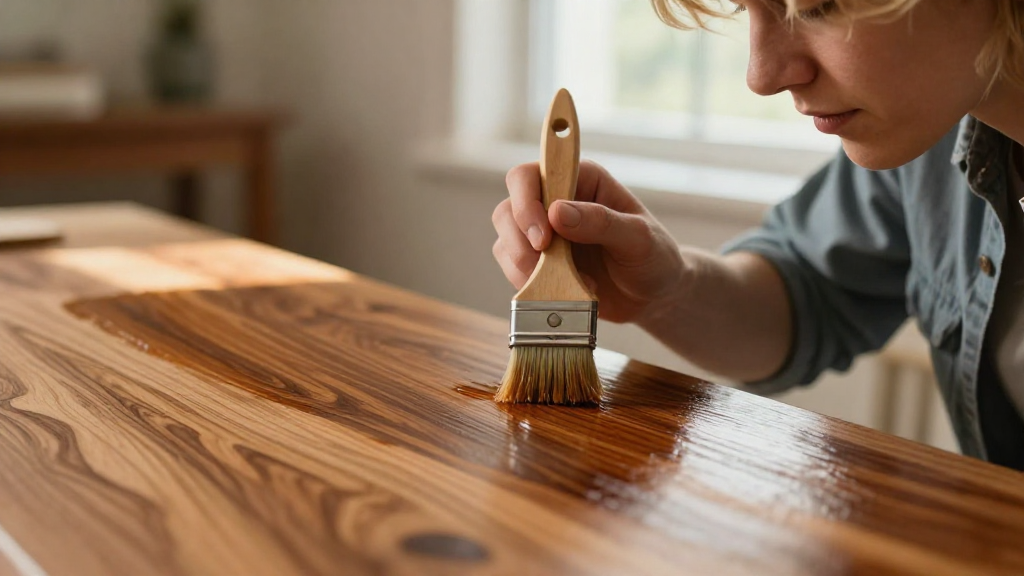
What is the Best Way to Apply Wood Stain?
Now that you have your materials and are prepared, it’s time to proceed with the staining process. Here’s how to apply wood stain effectively:
-
Test on a Scrap Piece:
– Before applying to your actual project, try the stain on a scrap piece of the same wood.
– This will give you an idea of the color and finish. -
Apply the Stain:
– Using a brush or foam applicator, apply the stain in the direction of the grain.
– Work on small sections at a time for even coverage. -
Wipe Off Excess Stain:
– After a few minutes (check the manufacturer’s instructions), use a lint-free cloth to wipe off any excess stain.
– This step is crucial to avoid blotchiness. -
Let It Dry:
– Allow the stain to dry completely, which can take anywhere from a few hours to overnight.
– The drying time can vary based on the stain type and room temperature. -
Apply a Second Coat (If Desired):
– If a darker shade is desired, repeat the application process for a second coat, ensuring that the first coat is dry before beginning.
How Do You Finish Stained Wood?
Once you’re satisfied with the stain, sealing the wood enhances durability and protects against wear and tear. Here’s how to finish stained wood:
-
Choose a Topcoat: Select either oil-based or water-based polyurethane, depending on your project.
-
Oil-based finishes: Provide a warm, amber tone but take longer to dry.
-
Water-based finishes: Dry quickly with less odor but can raise the wood grain.
-
Apply the Topcoat:
- Use a clean brush or applicator to apply the finish in thin, even layers.
-
Sand lightly between coats with fine-grit sandpaper for the best results.
-
Let It Cure:
- Allow the topcoat to cure completely, following the product instructions for best results.
- This is crucial for achieving a hard, protective film over the stain.
How to Maintain Your Stained Wood?
To keep your stained wood projects looking their best, consider these maintenance tips:
-
Regular Cleaning: Wipe surfaces with a damp cloth to keep them free from dust and spills.
-
Reapply Topcoat: Depending on the wear and tear, consider reapplying a fresh coat of polyurethane every few years.
-
Avoid Harsh Chemicals: Stay away from abrasive cleaners that can damage the finish.
What Common Mistakes Should Beginners Avoid?
When learning how to stain wood for beginners, it’s essential to be aware of some common pitfalls:
-
Skipping Preparation: Always sand and clean your wood before staining. Skipping this step can result in a blotchy finish.
-
Overworking the Stain: Don’t go back over stained areas after you’ve wiped them. This can lead to uneven coloring.
-
Ignoring Safety Precautions: Always wear gloves and a mask when working with stains and finishes to protect yourself from harmful chemicals.
Can You Stain Over Old Stain?
Yes, you can stain over old stain, but preparation is crucial. Here are steps to follow:
-
Inspect the Wood: Ensure that the old stain is in good condition. If it’s flaking or peeling, you may need to sand it down.
-
Clean the Surface: Like before, cleaning is essential to ensure that the new stain adheres properly.
-
Apply New Stain: Follow the same process as you would for new wood.
Conclusion
Staining wood can be an exciting and rewarding venture, especially when you know how to stain wood for beginners correctly. With the right preparation, materials, and techniques, you can achieve beautiful and long-lasting results.
Remember to take your time, practice your methods, and most importantly, have fun enhancing the beauty of your wooden projects. Happy staining!