Are you looking to learn how to build a live edge table that adds aesthetic appeal and functionality to your space?
In this guide, we’ll explore the entire process, from selecting the perfect slab to the finishing touches that elevate your table. Whether you’re a seasoned woodworker or a DIY enthusiast, constructing your own live edge table can be a rewarding project.
What Materials Do You Need?
Before diving into the process of how to build a live edge table, it’s essential to gather all necessary materials.
Here’s a list of what you’ll need:
- Live edge wood slab (such as walnut, oak, or maple)
- Wood epoxy filler (for filling any cracks or imperfections)
- Sandpaper (various grits from 80 to 220)
- Wood stain or finish (your choice of color)
- Wood glue
- Saw (table saw or circular saw)
- Router (optional for edges)
- Clamps
- Level
- Measuring tape
- Screwdriver and screws (if making a base)
- Safety gear (gloves, goggles, mask)
With everything at hand, you’re ready to proceed with understanding how to build a live edge table.
How to Choose the Right Slab?
Choosing the right slab is crucial in how to build a live edge table that not only fits your style but also is functional.
Consider these factors:
-
Wood Type: Look for woods like walnut, cherry, or ash for their beauty and durability.
-
Thickness: Aim for a thickness of at least 2 inches for stability.
-
Imperfections: Decide how you want features like knots and cracks to play into your design.
-
Size: Measure the area where the table will live to ensure your slab fits.
Once you have your perfect slab, it’s time to prepare it for building.
How to Prepare the Slab for Construction?
Properly preparing your slab is a critical step in learning how to build a live edge table.
Step 1: Clean the Slab
Make sure to remove any dust, dirt, and bark.
Step 2: Fill Cracks
Use wood epoxy filler to fill any gaps.
-
Mix the epoxy as per the manufacturer’s instructions.
-
Apply it generously to identified cracks and allow it to cure.
Step 3: Sand the Surface
Thoroughly sand the slab to achieve a smooth finish.
- Start with 80-grit sandpaper and gradually progress to 220-grit for a fine finish.
- Sand with the grain to avoid scratches.
Once the sanding is complete, your slab should be smooth and ready to take on the next steps.
What Base Should You Use?
Deciding on a base is an essential aspect of how to build a live edge table.
Options for Table Bases:
-
Hairpin Legs: Minimalist and stylish, perfect for a modern look.
-
Wooden Legs: A solid and sturdy option, customizable to your preferred style.
-
Metal Frame: Provides an industrial aesthetic while ensuring strength.
-
Pedestal Base: Creates a unique visual and can be sturdy for larger tables.
Choose a base that complements your slab’s design.
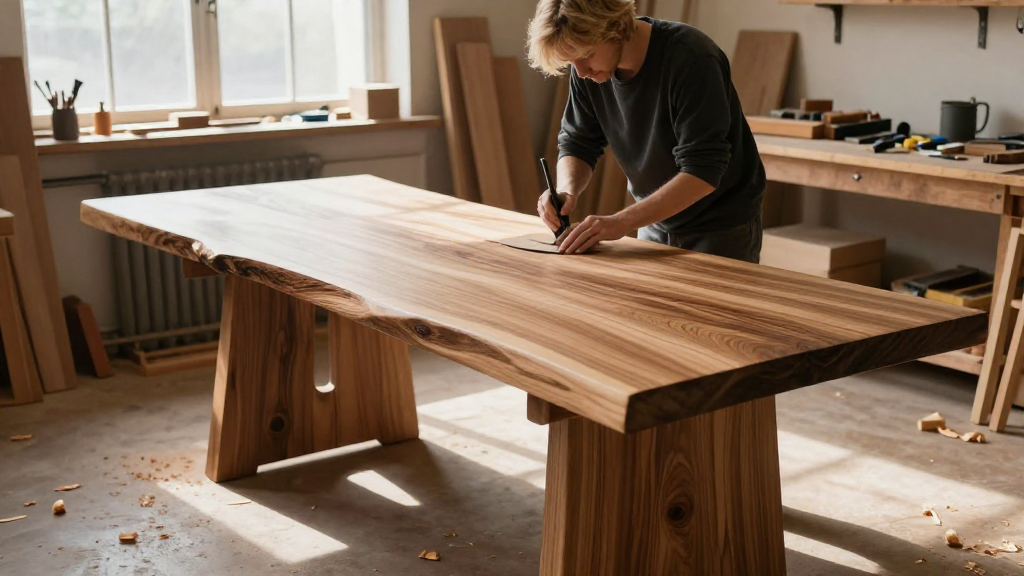
How to Attach the Slab to the Base?
Now that your slab and base are ready, let’s focus on the assembly stage of how to build a live edge table.
Step 1: Position the Slab
- Place the slab upside down on a clean, flat surface.
- Ensure it is centered on your base.
Step 2: Secure the Slab
-
Use clamps to hold the slab in place temporarily.
-
Drill pilot holes where the slab will meet the base to prevent splitting.
-
Screw the slab to the base, tightening the screws enough for stability but not too tight to warp the wood.
Step 3: Check for Level
Use a level to ensure everything is flat before moving to the next step.
How to Finish Your Live Edge Table?
Finishing your table is one of the most exciting aspects of how to build a live edge table.
Step 1: Apply Stain or Finish
- Choose a stain that enhances the natural beauty of wood.
- Use a clean cloth to apply the finish evenly.
- Allow it to dry according to the manufacturer’s instructions.
Step 2: Final Sanding
After the stain has cured, give it a light sanding with fine-grit sandpaper to smooth any rough patches.
Step 3: Topcoat
- Select a topcoat (polyurethane or a natural oil finish) to protect your table.
- Apply 2-3 coats, allowing adequate drying time between applications.
Step 4: Buff the Surface
After the final coat, buff the surface with a soft cloth to achieve a polished look.
How to Care for Your Live Edge Table?
Learning how to build a live edge table is just the beginning; taking care of it is equally important.
Here are some tips for maintenance:
- Wipe Spills Immediately: Protect against stains by cleaning up spills quickly.
- Use Coasters and Placemats: Prevent scratches and heat damage.
- Regular Dusting: Use a microfiber cloth to keep the surface clean.
- Reapply Finish: Depending on usage, consider reapplying a finish every few years for renewed protection and luster.
Conclusion: Can You Build a Live Edge Table?
Now you know how to build a live edge table from slab to finish!
The timeless appeal of a live edge table is undeniable, and by following this guide, you can create a unique piece that showcases the beauty of natural wood.
Embark on your woodworking journey, and soon you will have a stunning live edge table that not only enhances your home but also serves as a testament to your craftsmanship.
Happy building!