Installing pegboard for workshop tools can transform your space into a well-organized and efficient area where you can easily find what you need.
What is Pegboard and Why Use It?
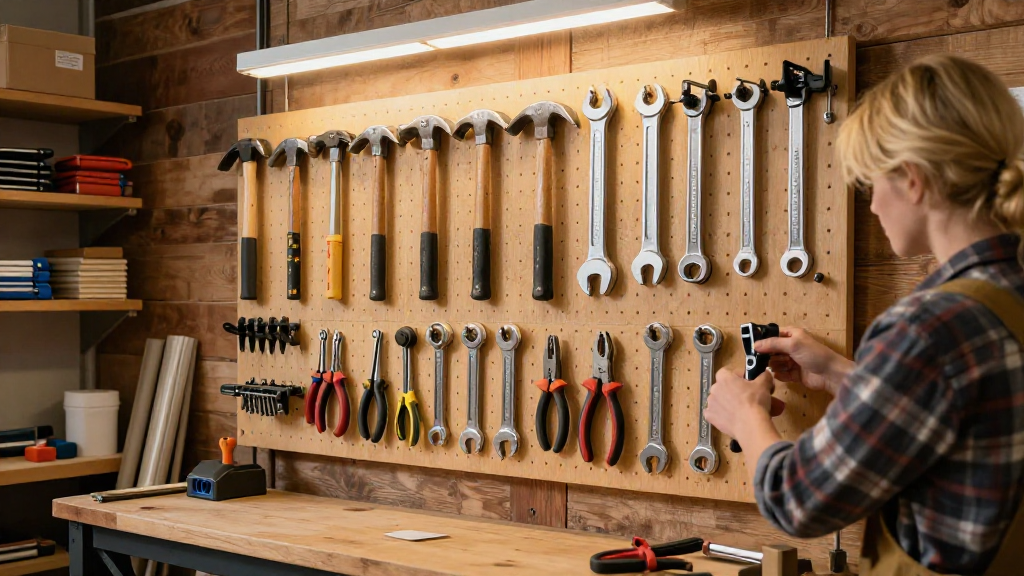
Pegboard is a versatile wall-mounted storage solution that allows you to hang tools and accessories using hooks, baskets, and shelves.
It’s an excellent choice for workshops because:
- Accessibility: Tools are visibly displayed and easy to reach.
- Customizability: You can adjust the arrangements based on your tools and preferences.
- Space-saving: Maximizes vertical space, freeing up work surfaces.
How Can You Start Installing Pegboard for Workshop Tools?
Installing pegboard for workshop tools involves a few straightforward steps. Here’s how you can get started:
1. Choose the Right Location
Selecting the right wall space is crucial.
- Find an area that is easily accessible.
- Ensure there is enough room for the tools you plan to hang.
- Consider areas that are high enough to avoid clutter on your workbench.
2. Gather Your Materials
Before starting the installation, gather all necessary materials:
- Pegboard sheets (commonly ¼ inch thick)
- Wood furring strips for air circulation
- Screws or nails for fastening
- Drill and drill bits
- Level for even installation
- Saw (for adjustments)
3. Cut the Pegboard to Size
Measure the dimensions of your chosen space before cutting your pegboard.
- Use a saw to cut your pegboard to fit the wall.
- Smooth out the edges to prevent splintering.
4. Install Furring Strips
Furring strips are essential as they provide a gap between the wall and pegboard.
- Attach the furring strips vertically to the wall with screws.
- Position them 16 inches apart to ensure stability.
5. Hang the Pegboard
Once the furring strips are in place, you can hang the pegboard.
- Align the pegboard with the furring strips.
- Use a level to ensure it’s straight.
- Secure the pegboard using screws through the holes in the pegboard into the furring strips.
6. Add Pegboard Accessories
Now it’s time to customize your setup!
- Hooks: There are various types of hooks available for different tools.
- Baskets: Use to hold smaller items like screws, nails, and glue.
- Shelves: Perfect for heavier tools that need an extra level of support.
What Tools Can You Organize with Pegboard?
When installing pegboard for workshop tools, think about what you need to store.
Here’s a list of tools that are perfect for pegboard organization:
- Hand tools: Screwdrivers, hammers, wrenches
- Power tools: Drills, saws
- Gardening Tools: Rakes, shovels
- Crafting Supplies: Paintbrushes, scissors
- Miscellaneous items: Tape measures, safety goggles
How Can You Customize Your Pegboard Setup?
To maximize the benefits of installing pegboard for workshop tools, you can further customize it based on your habits and tasks.
1. Color Coding and Labels
Consider using color-coded hooks and labels to enhance visual organization:
- Color Code: Use different colors for different categories of tools, such as crafting, woodworking, and gardening.
- Labels: Add labels next to each tool for quick identification.
2. Harness the Power of Vertical Space
Utilizing vertical space is key.
- Hang items that you use most often at eye level for easy access.
- Place less frequently used tools towards the bottom or upper areas.
3. Regular Maintenance
To keep your pegboard organized:
- Review: Regularly check your setup to ensure everything is in its proper place.
- Declutter: Remove any tools that you no longer use or need.
What Are the Benefits of Organizing Tools with Pegboard?
Organizing your tools using pegboard comes with numerous advantages:
- Improved Efficiency: Finding and accessing your tools becomes quicker and easier.
- Safety: Reduces clutter on the workbench, minimizing accidents and injuries.
- Aesthetic Appeal: A neat and organized pegboard can enhance the overall look of your workshop.
Are There Any Alternatives to Pegboard?
While pegboards are a fantastic storage solution, there are alternatives to consider if you’re looking for variety:
- Slatwall: Offers a different aesthetic and more robust support.
- Magnetic Tool Holders: Great for metal tools, providing quick access.
- Shelving Units: Useful for larger tools or those that don’t hang easily.
Can You Utilize Pegboard for More Than Just Tools?
Certainly! Beyond tool storage, pegboard can also be used for:
- Crafting supplies: Store paint, brushes, and other artistic essentials.
- Kitchen organization: Hang cookware and utensils for easy kitchen access.
- Home office: Manage stationery supplies and documents.
Conclusion
Incorporating pegboard into your workshop is a smart, practical solution for keeping tools organized and accessible.
By following these installation tips and using the suggested customization techniques, you’ll create a functional workspace tailored to your needs.
Are you ready to start installing pegboard for workshop tools? Your organized workshop awaits!